Skip to content
Taktila ledstråk i mässing i hotellobby
Tactile Guidance Paths.

A how to guide on how to guide.

Everything you need to know about tactile guidance paths: regulations, recommendations, design and placement – all gathered in one place. Just like a guidance path, we’ll guide you in the right direction!

Klubba icon

What Does the Legislation Say About Tactile Guidance Paths?

The Planning and Building Act issued in 2010 clearly states: A building must be accessible and usable for people with reduced mobility or orientation ability. This applies to new buildings as well as to renovations – and likewise to the development of new public spaces and areas.

Arkitekt icon

What Does This Mean in Practice?

According to the Swedish National Board of Housing, Building and Planning’s building regulations issued in 2011, the provisions and general guidelines state that important destination points in buildings such as entrance doors, elevators, receptions, toilets, and escape routes—must be easy to detect and locate, even for people with reduced orientation ability.

Tactile Guidance Paths.

Tactile Guidance Paths – How They Work

Contrasting Against the Surrounding Surface

Contrasting Against the Surrounding Surface

Tactile guidance paths and contrast markings must be installed using a contrasting material and a lightness contrast of 0.4 NCS – either lighter or darker than the surrounding surface. There are recommendations regarding their design, but no exact laws specifying what they must look like. Metal, polyurethane, smooth, ribbed – the options are many. Integrate them into the interior design, into the overall concept, and let them take their place!
Tactile Guidance Paths: Placement and Design

Tactile Guidance Paths: Placement and Design

Tactile guidance paths must lead to important destination points such as elevators, stairs, receptions, and toilets. The strips should be installed in rows of three (two can also work, but for extra clarity we always recommend three rows), with a spacing of 115 mm (center to center) and 30 mm respectively.The material may vary, but the design of the strips is generally almost always the same: 280 mm long, 35 mm wide, and 3–5 mm high. Indoors, the height may vary depending on preference, taste, and overall design. Outdoors, however—where surfaces are often more uneven and textured—it is important that the strips are at least 5 mm high.The guidance paths must also lead past potential obstacles and should therefore be installed at a safe distance of at least 600 mm from the obstacle.

Tailor Made – Just the Way It Should Be

The whole lies in the details. That’s why we offer a wide range of tactile guidance paths and contrast markings in a variety of materials and designs.We can also help you develop custom models and made-to-measure guiding strips – tailored to your specific requirements to match your vision. Get in touch with us!

Tactile Guidance Paths: Warning Surface

Tactile Guidance Paths: Warning Surface

A guidance path that leads to a hazard—such as a staircase, a high edge, a steeper floor incline, or an area with crossing traffic—must end with a warning surface. Warning surfaces must consist of domes, known as stop indicators, arranged in a square area of at least 400 x 400 mm.Stop indicators are circular markers measuring ⌀35 mm with a flat top surface—like a truncated dome. The round shape with the flat top makes them easy to detect with a cane.
Tactile Guidance Paths: Decision Surface

Tactile Guidance Paths: Decision Surface

A tactile guidance path can turn, change direction, or continue in more than one direction. In such situations, it is important to alert the person following the path that a choice can be made—continue straight ahead or turn and proceed in another direction. This is done using a decision surface.The decision surface must be completely smooth, with straight edges and without any detectable joints that could cause confusion or make the cane get stuck. The smooth surface must be perfectly square, with sides measuring 400–700 mm. After the decision surface, the guidance path continues with tactile guiding strips extending in two or more directions.
Tactile Guidance Paths: Stairs

Tactile Guidance Paths: Stairs

At staircases, the guidance path must lead to the right-hand handrail, viewed from below. It is also important that the distance between the staircase and the last guiding strips is correct, allowing the person enough space to understand that something is about to happen. A distance of 500 mm is therefore recommended.From the opposite direction, meaning those approaching the stairs from above must be alerted with a warning surface.
Tactile Guidance Paths: Turns

Tactile Guidance Paths: Turns

A guidance path that changes direction can be designed in different ways. Just like accessibility itself, we are inclusive and present the three most common layouts, but we always recommend this first option.The turn consists of an empty space framed by one guiding strip in each direction. The placement of the strips, with the right-angled framing, is considered by many blind and visually impaired people to be the clearest option to detect with a long cane.
It is also possible to place three transverse guiding strips directly adjacent to the first strips. The tactile guidance path then continues in the new direction.The third option is to leave a gap between the strips. In this case, it is important that the gap is not too large, as it may be mistaken for a decision surface.
Tactile Guidance Paths: Installation Methods.

How to Install Guiding Strips

Installation with Pins

Installation with Pins

Pins are by far the strongest and most durable installation method – and the one we always recommend as the first choice. The pins, made from the same material as the profile itself, are inserted into pre-drilled holes filled with installation adhesive.This method is suitable for all types of stone and concrete floors, both indoors and outdoors. It requires some effort, but the result is worth it: durable, impact-resistant, and long-lasting – perfect for areas with heavy traffic and high wear.
Assembly with glue.

Assembly with glue.

If you do not want to or are not allowed to—drill into the floor, a completely smooth backing is a good alternative. The profiles are then glued directly to the floor using an adhesive suited to both the substrate and the profile material.The adhesive method is suitable for stone, concrete, and wooden floors, but it does not guarantee as strong a result as the pin method. However, it is an excellent option when it is important not to damage the floor or when the surface is slightly uneven or textured.
Installation with Screws

Installation with Screws

Guiding strips, stop indicators, and contrast markings that are to be installed on wooden surfaces can advantageously be screwed into place. The profiles are delivered with pre-drilled screw holes and are easily fastened using stainless steel screws.The screw method is time-efficient and provides a strong and weather-resistant result, making it ideal for installation on outdoor wooden surfaces.
Installation with 3M tape.

Installation with 3M tape.

Double sided tape from 3M is a suitable option when either the substrate or the tactile profile is made of polyurethane or another thermosetting plastic. It is time-efficient and provides a surprisingly strong result.

Tactile Guidance Paths – A Glossary

Tactile guiding strips, guidance paths, accessible strips – a beloved concept has many names. Let’s unravel this!

Accessibility Products

A classic slang expression and umbrella term for tactile accessibility aids. Often used by someone who isn’t quite sure what it’s called, but still wants to include the word “accessibility” to increase the chances that the recipient understands what they’re actually referring to.

Accessibility Strips

A less accurate but fully understandable term for tactile guiding strips. Good enough in a pinch, as the saying goes.

Tactile Strips

Now we’re getting closer to tactile guiding strips. Here, the word tactile is included—and “strips”… well, that works too!

Accessible Strips

A mix of accessibility aids and tactile guiding strips – the best of both worlds.

Guide sticks.

Another classic slang expression. Without the word “tactile,” it can be unclear—but in the right context, it works!

Tactile Guiding Strips

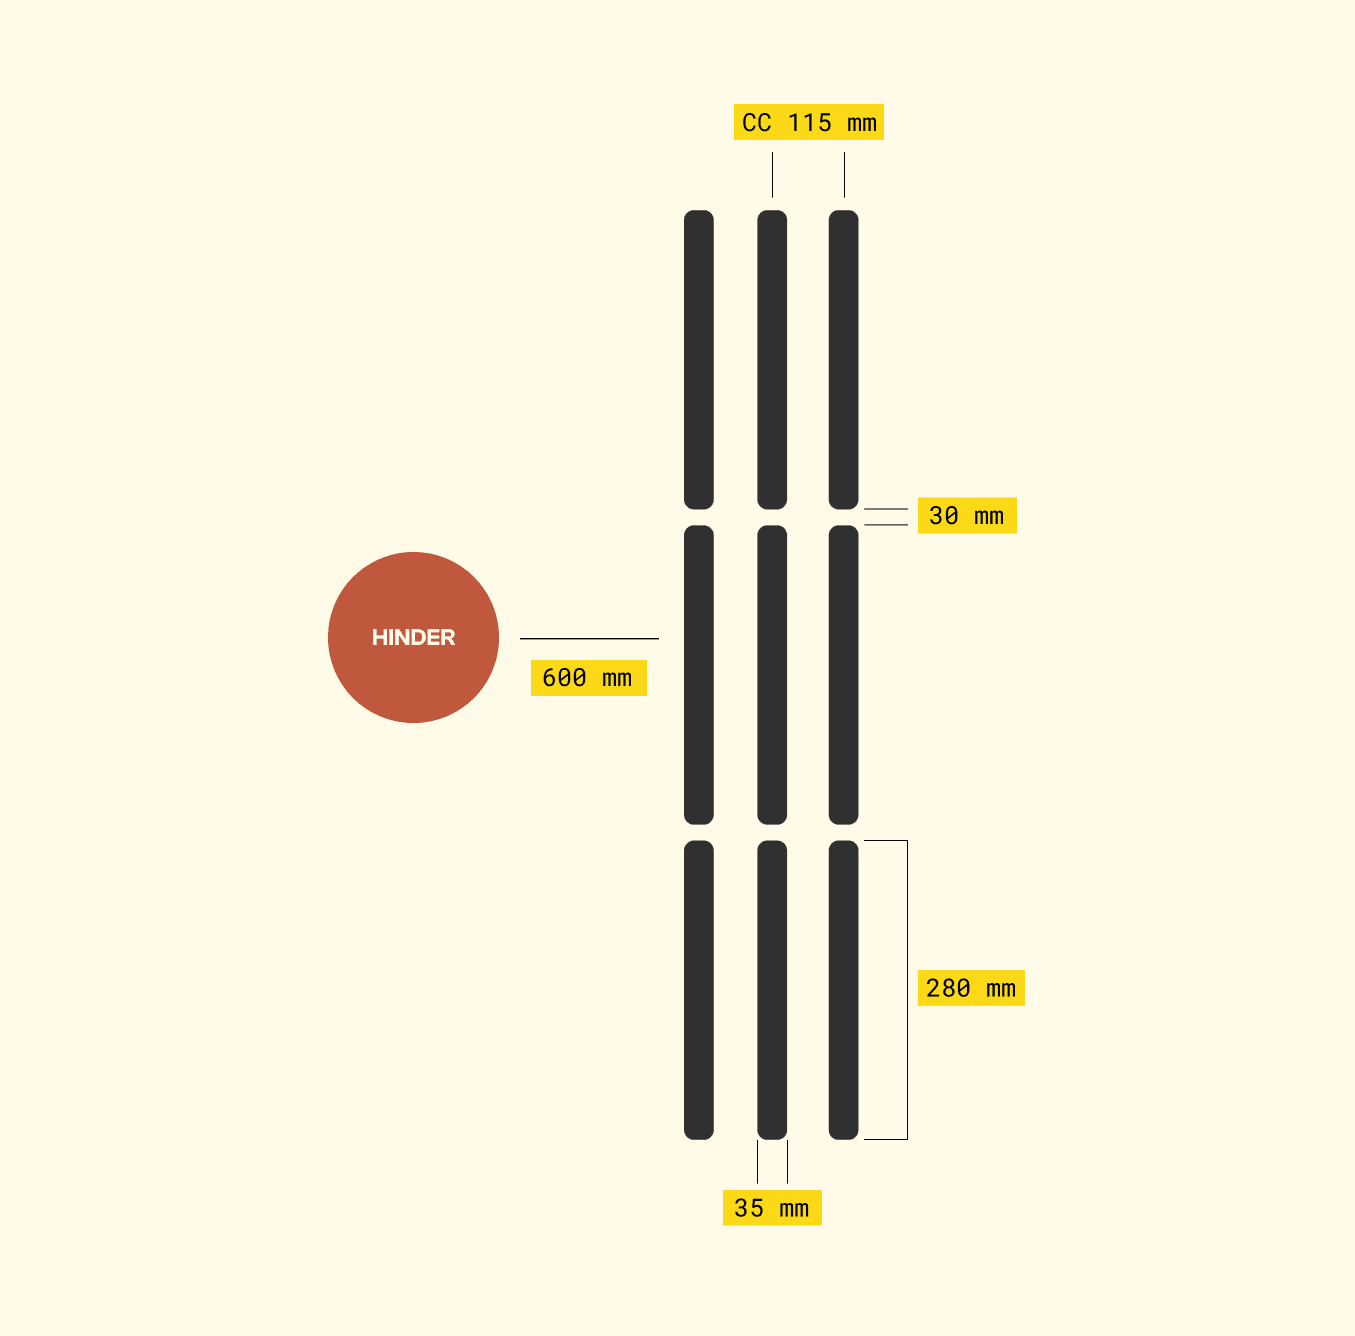
Bingo! The fully correct term. Tactile guiding strips are installed side by side in rows of two or three to form a guidance path.

Guidance Surface

A guidance surface provides orientation in a longitudinal direction. There are both artificial and natural guidance surfaces. Artificial guidance surfaces can be divided into three categories: guidance surface, decision surface, and warning surface.
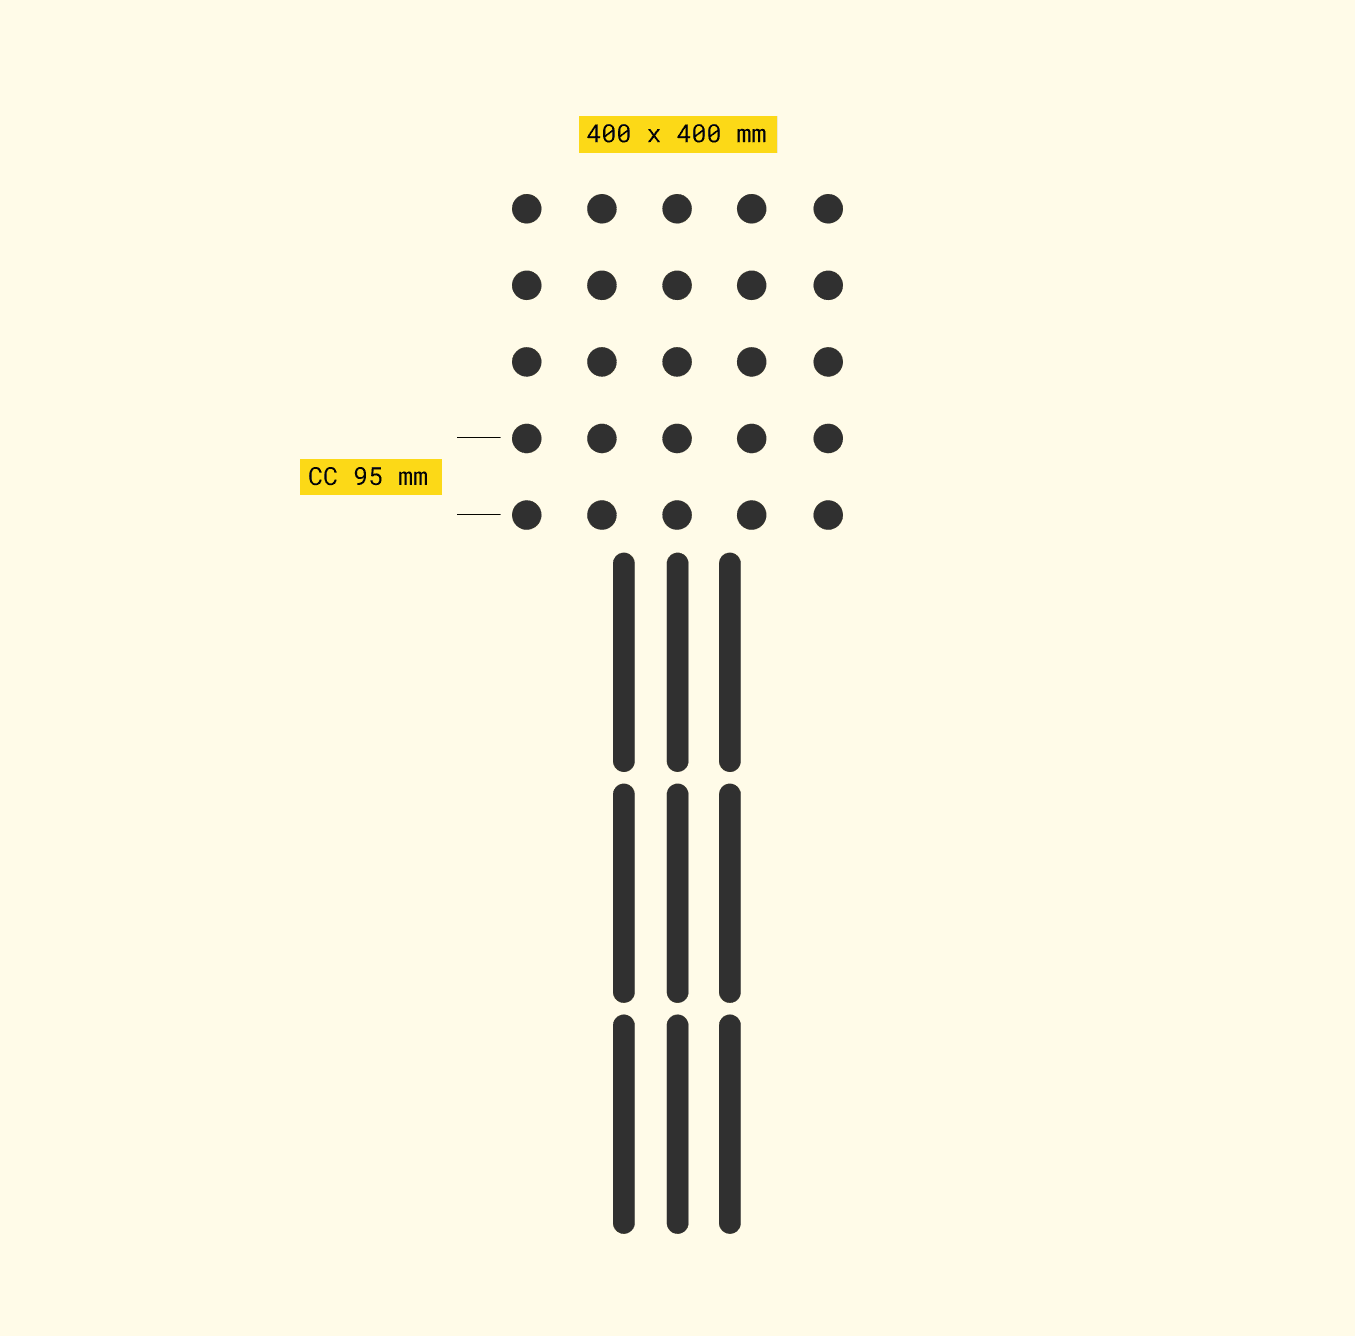
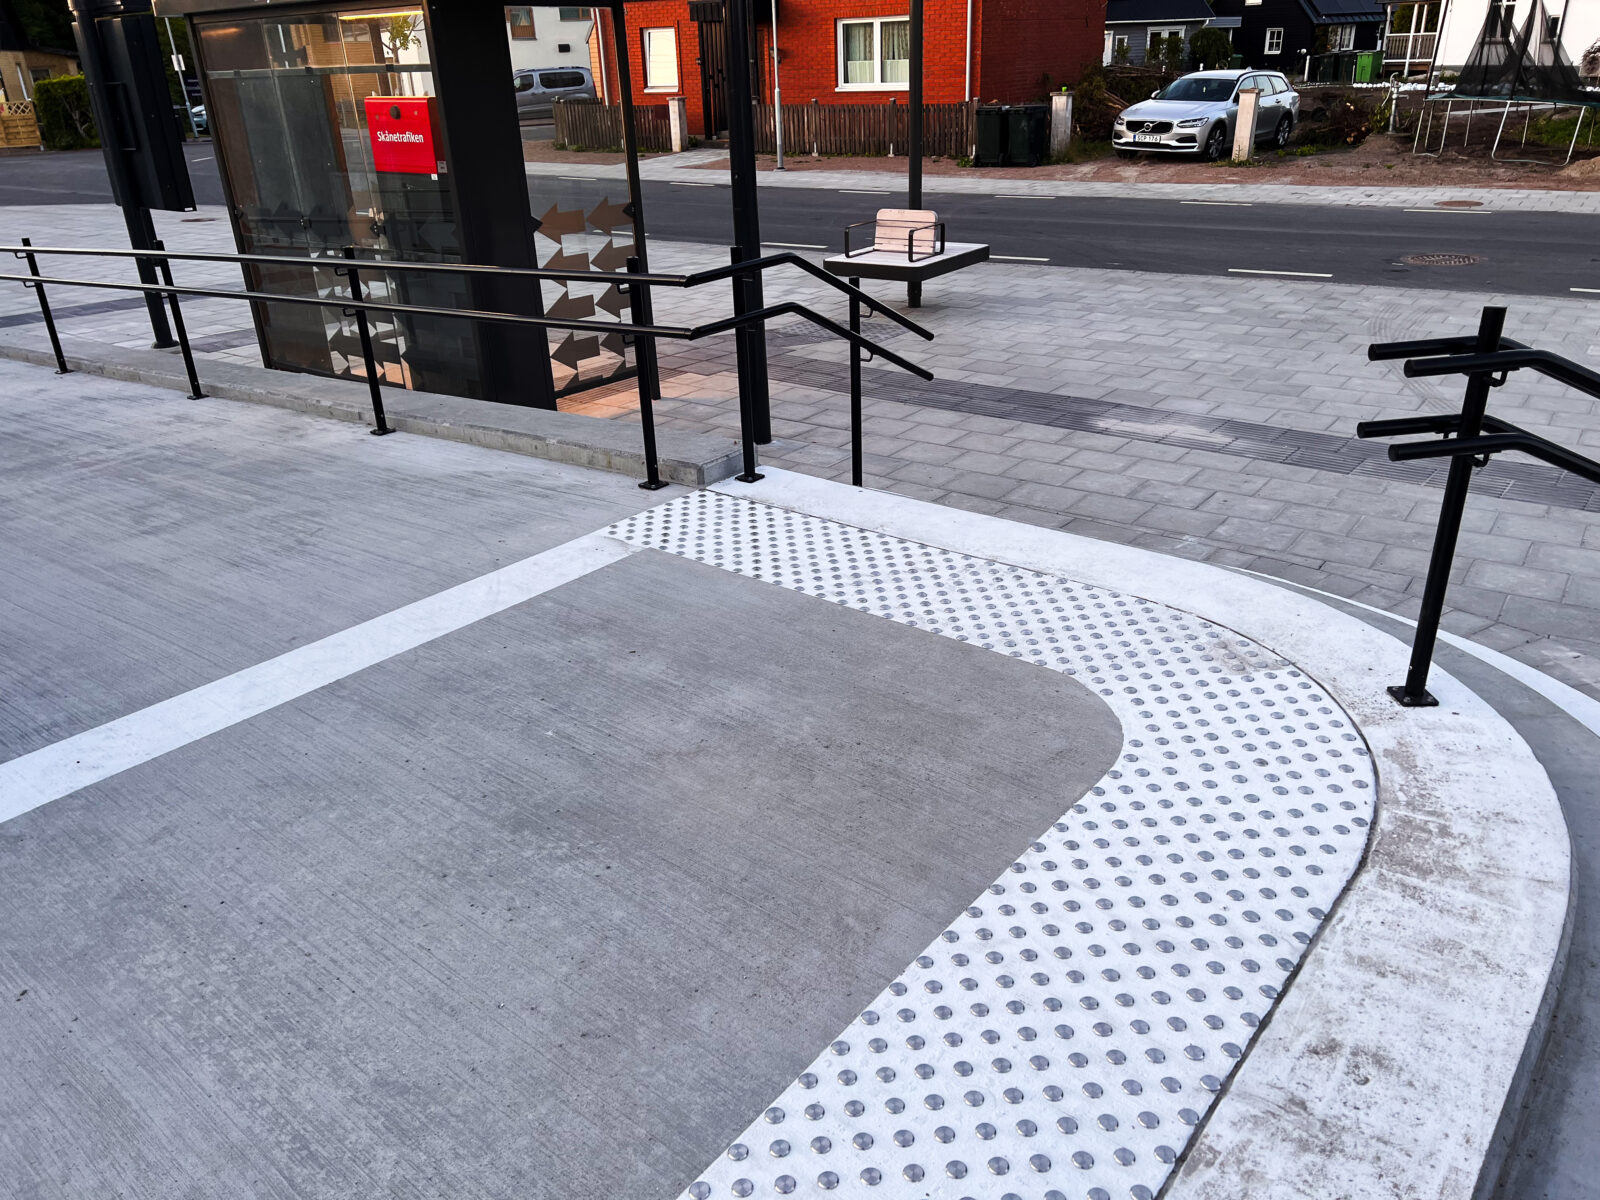
Warning Surface

A warning surface consists of a dome tile or stop indicators that together form a square. The purpose of a warning surface is to alert and draw attention to the fact that something is happening—that the person has reached a pedestrian crossing, staircase, platform, edge, or raised surface.

Decision Surface

The decision surface is intended to indicate that one or more choices can be made and consists of a completely smooth, square tile.

Attention Field

In general, an attention field is similar to a warning surface. Its purpose is to alert the person that they have reached, for example, an elevator, staircase, or door.

Stopping surface.

Another correct term for a warning surface. Both work!

Tactile Metal Studs

This one is interesting. We often hear that they’re like tactile strips—but studs. They simply refer to stop indicators—round markers that together form a stop or warning surface.

Stop Studs

Same thing here an informal, not entirely correct term for stop indicators. But tomato, tomahto we understand what it means, and that’s what matters!

Stop Indicators

Here we have the correct term but you probably knew that by now.

Den som väntar på något gott...

Sidan finns tyvärr inte än.

Välkommen tillbaka inom kort!

Quote list

Drag files here or click to upload
Max 4 files, max 5MB per file
File types: jpg, png, pdf
Thank you for your inquiry!
We will get back to you as soon as possible.

Favorites

Trial box

Fill in the form and we will send you a trial box.

The trial box contains a selection of our most popular products.

We will contact you to confirm your order.

The trial box is free of charge and you are not committed to anything.

Thank you for your inquiry!
We will get back to you as soon as possible.

3D files

Fill in the form to download our 3D files.

Download starts automatically!